


Many of my friends end up asking me one
question when seeing my gaming console’s current configuration: how are you using your external hard drive with PS3?
Their curiosity does not surprise me, as many gamers know that Sony’s popular
entertainment solution does not come with hard drive expansion options. Well, the
lack of official drive upgrades seemed like a challenge for techies. As to be
expected, they succeeded in finding a way to use the Playstation with an
external HDD. If you want to enhance your PS3’s specs space-wise, just read on.
Formatting and what you need to know
 The
workaround essentially has two main steps. The first one involves the need to
reformat the drive. Of course, you might wonder why it would be necessary to
alter the common USB HDD’s file format. I should probably point out one important
fact to partially satisfy your curiosity: ever since Windows NT arrived, hard
disks were mainly produced and distributed with the New File Technology System
(NTFS) pre-formatted on the drives. This just means that finding a new hard disk that is
pre-formatted in the old FAT32 system has become quite a challenge, if not
entirely impossible.
The
workaround essentially has two main steps. The first one involves the need to
reformat the drive. Of course, you might wonder why it would be necessary to
alter the common USB HDD’s file format. I should probably point out one important
fact to partially satisfy your curiosity: ever since Windows NT arrived, hard
disks were mainly produced and distributed with the New File Technology System
(NTFS) pre-formatted on the drives. This just means that finding a new hard disk that is
pre-formatted in the old FAT32 system has become quite a challenge, if not
entirely impossible.
As
you have guessed by now, Sony’s prime gaming console only works with external hard drives that
use FAT32. I admit that I became considerably worried when I first realized
that there was a need to change a drive’s format. After all, my knowledge of
conversion methods was still limited back then. Upon spending time searching for
convenient reformatting options though, I found out that all I have to do is to
download and install a particular piece of software: CompuApp’s SwissKnife V3.
Simply put, the application makes it easy to change a drive’s file system from NTFS to FAT32 with just a few clicks of the mouse. No need to worry about geeky DOS commands or the like - all is done easily right on your desktop while the external hard drive is plugged into your computer.
The File Structure Requirement
 I
understand that you are excited to use your newly-converted external HDD. However,
you still have to carry out the workaround’s second step: creating a new set of
folders on the hard disk. Once again, you probably have doubts regarding the
need to follow such a part of this how-to. While it is true that choosing the
“display all files” option on the PS3’s menu is a surefire way of browsing the
contents of a FAT32-formatted HDD. It is also irrefutable that without proper
categorization, finding the right file would be a chore.
I
understand that you are excited to use your newly-converted external HDD. However,
you still have to carry out the workaround’s second step: creating a new set of
folders on the hard disk. Once again, you probably have doubts regarding the
need to follow such a part of this how-to. While it is true that choosing the
“display all files” option on the PS3’s menu is a surefire way of browsing the
contents of a FAT32-formatted HDD. It is also irrefutable that without proper
categorization, finding the right file would be a chore.
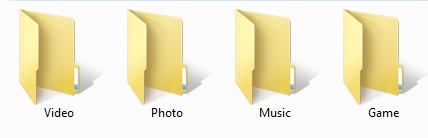
I
should tell you though, that just creating folders and naming them in any way
you wish would not be wise. It is essential to mimic the PlayStation’s file
directory on your external hard disk else it will not work. To do this, you would just have to create
four empty folders and afterwards rename them to the following: Photo, Music,
Video, and Game.
Once you are done, you are finally ready to place all the
files that you need in your PS3 NTFS
expansion drive (now converted to FAT32). You do have to copy MP3s, AVIs, and JPEGs into the right
folder if you want to avoid confusion when trying to access them.
Mac Options
 If
you have a Mac, then you would most likely have one problem with the two-step
HDD conversion method that I discussed above: CompuApp’s SwissKnife V3 only works on Windows.
If
you have a Mac, then you would most likely have one problem with the two-step
HDD conversion method that I discussed above: CompuApp’s SwissKnife V3 only works on Windows.
Well, I used to have a friend with the same dilemma and we
managed to solve this issue without much effort. All we did was use
the Disk Utility application, which is found in every iteration of Apple’s operating
system.
The only thing to remember here is that the format you have to choose while erasing/formatting the drive is MS-DOS, as doing so will convert the disk’s file system to FAT32 automatically.
Summary
Using a conventional portable or USB HDD on a PlayStation does not require much effort. After all, making a drive compatible with Sony’s console is just a simple two-step process:
- Format the external hard drive to the FAT32 file system (easily done with CompuApp's SwissKnife v3)
- Create 4 empty folders on the HDD called Photo, Music, Video and Game
If you are using a Mac, simply use the Disk Utility application that is already on your machine.
All in all even though techies discovered
this workaround, it is true that ordinary non-tech people like you and me are more than capable
of changing the PS3 external hard drive
format without breaking a sweat.
For more details, you can check out the following links which explain how to do each step in a little more detail:
http://extralives.wordpress.com/2010/02/28/formatting-an-external-hard-drive-for-the-ps3/
http://forums.macrumors.com/showthread.php?t=1222398
Good luck and Happy Gaming!